To a little surprise this time we are not presenting Interview question on any specific subject but on random topics. These question will surely help you in cracking Interviews beside adding to your Knowledge.

1. Let’s say you maintains a backup on regular basis for the company you are working. The backups are maintained in Compressed file format. You need to examine a log, two months old. What would you suggest without decompressing the compressed file?
Answer : To check the contents of a compressed file without the need of decompressing it, we need to use ‘zcat’. The zcat utility makes it possible to view the contents of a compressed file.
# zcat f phpshell2.4.tar.gz
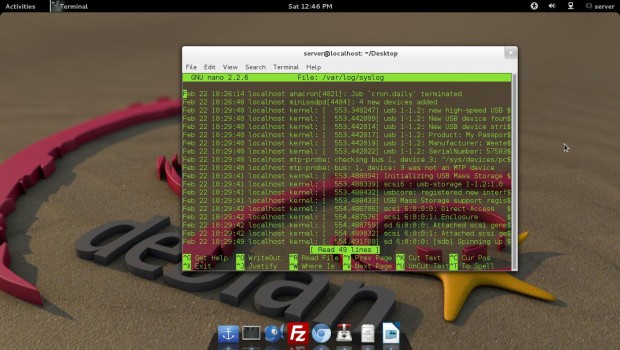
2. You need to track events on your system. What will you do?
Answer : For tracking the events on the system, we need a daemon called syslogd. The syslogd daemon is useful in tracking the information of system and then saving it to specified log files.
Running ‘syslogd‘ application in terminal generates log file at the location ‘/var/log/syslog‘. The syslogd application is very useful in troubleshooting Linux sytems. A sample log file looks similar to below.
3. How will you restrict IP so that the restricted IP’s may not use the FTP Server?
Answer : We can block suspicious IP by integrating tcp_wrapper. We need to enable the parameter “tcp_wrapper=YES” in the configuration file at ‘/etc/vsftpd.conf’. And then add the suspicious IP in the ‘host.deny’ file at location ‘/etc/host.deny’.
Block IP Address
Open ‘/etc/hosts.deny’ file.
# vi /etc/hosts.deny
Add the IP address that you want to block at the bottom of the file.
#
# hosts.deny    This file contains access rules which are used to
#               deny connections to network services that either use
#               the tcp_wrappers library or that have been
#               started through a tcp_wrappers-enabled xinetd.
#
#               The rules in this file can also be set up in
#               /etc/hosts.allow with a 'deny' option instead.
#
#               See 'man 5 hosts_options' and 'man 5 hosts_access'
#               for information on rule syntax.
#               See 'man tcpd' for information on tcp_wrappers
#
vsftpd:172.16.16.1
4. Tell us the difference between Telnet and SSH?
Answer : Telnet and SSH both are communication protocol which are used to manage remote system. SSH is Secured, which requires exchanging of key opposite of telnet which transmit data in plain text, which means telnet is less secure than SSH.
6. You need to stop your X server. When you tries to kill your X server, You got an error message that you cannot quit X server. What will you do?
Answer : When killing a X server, it won’t work normal way like doing ‘/etc/init.d/gdm stop’. We need to execute a special key combination ‘Ctrl+ Alt+ Back Space’ which will force X server to restart.
6. What is the difference between command ‘ping’ and ‘ping6’?
Answer : Both the commands are same and used for the same purpose except that the fact that ping6 is used with ipv6 IP address.
7. You want to search for all the *.tar files in your Home directory and wants to delete all at once. How will you do it?
Answer : We need to use find command with rm command to delete all “.tar” files.
# find /home/ name '*.tar' | xargs rm rf
8. What is the difference between locate and slocate command?
Answer : The slocate looks for the files that user have access whereas locate will search for the file with updated result.
9. You need to search for the string “Tecmint” in all the “.txt” files in the current directory. How will you do it?
Answer : We need to run the fine command to search for the text “Tecmint” in the current directory, recursively.
# find -name “*.txt” | xargs grep “Tecmint”
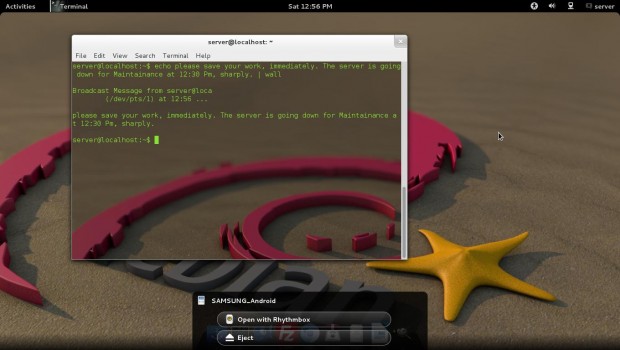
10. You want to send a message to all connected users as “Server is going down for maintenance”, what will you do?
Answer : This can be achieved using the wall command. The wall command sends a message to all connected users on the sever.
# echo please save your work, immediately. The server is going down for Maintenance at 12:30 Pm, sharply. | wall
That’s all for now. I will be here again, with an interesting article very soon. Till then stay tuned and connected to Tecmint. Don’t Forget to give your valuable feedback in comment section below.


I need all the linux interview questions & answers so that i can prepare for the interview by this december i need to crack job.
@Niharika,
Please check out our Interview Questions section, where you will find all Linux related questions, which will help you to prepare for your Job interview..
Awesome! thanks for the valuable information, awaiting for further questions!!
Good questions posted by tecmint, thanks a lot
lesspipe will be helpful for viewing backup which is compressed.
*.a
*.arj
*.tar.bz2
*.bz
*.bz2
*.deb, *.udeb, *.ddeb
*.doc
*.gif, *.jpeg, *.jpg, *.pcd, *.png, *.tga, *.tiff, *.tif
*.iso, *.raw, *.bin
*.lha, *.lzh
*.tar.lz, *.tlz
*.lz
*.7z
*.pdf
*.rar, *.r[0-9][0-9]
*.rpm
*.tar.gz, *.tgz, *.tar.z, *.tar.dz
*.gz, *.z, *.dz
*.tar
*.tar.xz, *.xz
*.jar, *.war, *.xpi, *.zip
*.zoo
Very very useful Thank You
On question #9, why not do:
grep Tecmint *
There are many ways to perform that operation in the current directory. However, not including subdirectories, one can type much less by using the above command…
@Lee,
The
grep Tecmint *, do you think this command will list string “Tecmint“? have you tried it before suggesting, i suggest you to try yourself and see long it takes and what it does before giving final results, for me this command is just a waste of time….and will not work at all..Answer : To check the contents of a compressed file without the need of decompressing it, we need to use ‘zcat’. The zcat utility makes it possible to view the contents of a compressed file.
This answer implies that zcat doesn’t decompress the file, and uses some fancy algorithm to read compressed data.
This is not the case, it decompresses the file anyway, then cats the decompressed data.
Very Useful ..Thank You :)
Thanku very much can you send more questions to me please
CTRL-ALT-BKSpace is disabled in most of the “desktop” linux distro’s. Best to kill it from CLI.
Very useful questions…..Thank you
Several comments:
7: find /home/ -name \*.tar -exec rm {} \;
– -exec says whenever you find a match, run the command substituting {} with the filename
– Escape characters that may be interpreted by the shell, like * and ;
– no need for -rf since these are files and not directories
The best method is: find /home -name \*.tar -delete
Hi Avishek,
your articles help a lot for linux beginners. But I was stuck with few questions.
I need to list the files from remote ftp server with regular expression as RCCCFHW01N[0-9]{4}2014[0-9]{10}.dat..
can you help me in listing the files particular 2014 in which remote server holds files from different years.
This is so baloney. Where is the Linux Bible ebook that I can download?
@Amalayar,
Here is the download link to the Linux Bible ebook.
http://tecmint.tradepub.com/free/w_wile13/prgm.cgi
hello sir,
i have problem with :
X windows system, X server crashing and non-root users, when i try log in
Thanks for sharing your thoughts on linux interview questions.
Regards
Welcome @ Delta Zeta house.
Hi Avishek,
It is really great learning. I have interview for the position of Linux Admin (3-7 Yrs+) exp. What level of expectation they have from me as a 3 Yrs + experience guy?
Please suggest some of key area where I have to prepare.
Thanks
Dear Thakur,
It totally depends upon what/whom the company is dealing with and Interviewer’s mood. Still toopics like – Networking, Protocol, Kernel, Scripting, Automation, SSH, FTP, etc are all evergreen. Keep connected with us and in that mean check our previous posts.
It’s really very informative.. Excellent Job Avishek. Possible please share Linux real time troubleshooting guide.
Dear ARK,
Keep connected.
We keeps on posting questions of all sorts, very often.
Nice Article Dear!
Great to know @ Rajesh kumar
Dear Sir,
I am new user and interest to learn Linux, kindly suggest me.
Dear Devasish Majumdar,
keep connected with us. Learning is a slow process. You have to learn everyday and so are we coming up with tutorials everyday.
Enjoy!
Very usefull and easy to understand.Keep posted more new things like xsh,rhel 7 etc. thanks
Dear abdyrakhman,
Thanks.
We are working continuously to bring contents that are reliable, important, updated, unique and Interesting to our Users. Keep Conncted.
Check our other Interview series articles here: https://www.tecmint.com/category/interview-questions/
Thanks Avishek Kumar. Its nice chapter :)
Welcome @ Hari
Above article really helpful ..Thanks to Tecmint and Avishek . i really appreciate if get more Q & A on Linux not for crack the interview but also for the knowledge and update .
Dear swapnit,
Thanks for such a wonderful comment. You may find the rest of our Interview Article below.
https://www.tecmint.com/category/interview-questions/
This is a pretty good list. Though some can have multiple answers. For example:
Number 2: Systemd systems have the journal, which not only allows the same functionality as syslogd, but also allows for some advanced features to access the log almost like a database. You can also use syslogd to supplement it.
Also, there’s a problem with number 5: For the past several years Xorg has defaulted to DISABLING CTRL+ALT+BACKSPACE completely. It’s nice to have but unless you configure it ahead of time you can’t count on that option. Worse comes to worse you can use magic sysrqs (Admittedly they can be disabled too.) to take system control back. Another alternative is to always have sshd running (Or socket activated on systemd.) and tunnel in with another machine or device and kill X from there.
Finally, on 10, why the heck would you use echo to pipe into wall? Waste an entire process on that? Just use wall echo | wall is wasteful and inefficient.
Dear Yaro,
we have always been saying that there may be more than one answer to a question. we mainly focus on the easiest way to get through yet with perfection.
Yet! your feedback is wonderful and we are thankful to you for your time you gave in explaining the solution, the other way.
Nice and very helpful article.. Please post some more interesting articles. thanks!
Dear Mayank D,
we are happy to know the post was helpful.
nice and helpful article.
Thanks @ Abhishek Shrama for your feedback.
Hi,
This is very good notes. I am very happy if you share some lvm, filesystem and storage connectivity question answer.
Dear Dinesh Bahadur,
Keep connected we are coming with more such articles.
Dear Sir,
Humble request, Please sir provide me tchnical solved question answer as you have post on this site. i prepare it for my career.
Dear chander kant,
keep connected we are coming with Interview articles every Saturday.
alternative to 7
Not an alternative, in fact. find has its inbuilt command -exec
find /home -iname “*.tar” -exec rm -f {} \;
thanks @ Phincy
Alternative for number 1
tar has its own inbuilt option -t, to see the contents without decompressing the file
Yeah Phincy!
We have always been saying that there may be more than one answer to a question and we try to find a solution that is easy yet perfect.
Thanks for your feedback.
thnk you sir…keep me update……
Welcome @ prasad,
keep connected.
Correction
find -name “*.txt” | xargs grep “Tecmint”
Dear Chandan,
where is the correction?
Your this script and our above written script is exactly the same.
Thank you for the wonderful tutorial :) By the way how about DDOS attack do you have tips to avoid this in your server? Thanks
Thanks @ Ariel Licas for the compliment,
we will be presenting post on DDOS.
sir i am a fresher please provide me questions for interview prepration
Dear rajesh,
it is not possible for us to send our materials to personal mail of our every fan. Moreover it is against our copyright law to send or use the post in any form, withour prior permission of Tecmint.com
Keep connected to Tecmint, and be updated.
Alternatively for number 9, you can achieve the same results in one command (without the pipe to xargs) by using:
$ grep -r “Tecmint” *.txt
Well said @ Link Porterfield,
there is always another way to perform the same task.